Pneumothorax aspiration (needle thoracocentesis)
Indications for pneumothorax aspiration (needle thoracocentesis)
- Primary spontaneous pneumothorax greater than 2cm (at level of hilum) +/- breathlessness
- Primary spontaneous pneumothorax under 2cm but symptomatic
- BTS guidelines advise 2 attempts at aspiration can occur
- If the primary pneumothorax is less than 2cm and the patient is asymptomatic re-image in 2-3 weeks
- Tension pneumothorax
Equipment required for pneumothorax aspiration (needle thoracocentesis)
- Sterile field
- Sterile dressing pack and gloves
- 2% Chlorhexadine swabs
- Analgesia
- 4mls of 1% or 2% Lidocaine
- Orange (25G) needle (x1)
- Green (19G) needle (x1)
- 5ml Syringe (x1)
- 16-18 gauge cannula
- 3-way tap
- 50 ml syringe
Contraindications to pneumothorax aspiration (needle thoracocentesis)
- Severe coagulopathy
- Pneumothorax less than 2cm and asymptomatic
- Secondary pneumothorax
- Local infection
Pre-procedure:
- Gain consent from the patient – ideally consent should be written
- Consent for pain, failure of procedure, bleeding, infection, damage to surrounding structures
- Familiarise yourself with the landmarks
- 2nd intercostal space in the midclavicular line (above rib to avoid neurovascular bundle on posterior aspect of second rib)
- Mark area if necessary
- Set up a sterile trolley with equipment
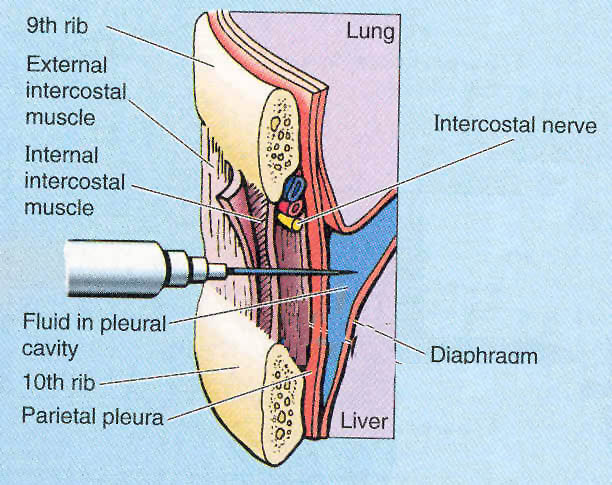
Location of intercostal structures (note diagram shows effusion, not pneumothorax)
Procedure for pneumothorax aspiration (needle thoracocentesis)
- Don sterile gloves and clean area with chlorhexidine
- Apply sterile field
- Insert lignocaine 5-10ml initially under the skin and then into subcutaneous tissues and pleural space.
- Air should be aspirated with green needle and local anaesthetic
- Take cannula and insert at 90 degrees in second intercostal space, midclavicular line
- Begin to remove needle once at the depth air was aspirated with the green needle but advance plastic sheath to the hilt. Be cautious not to kink the cannula
- Attach three way tap to cannula and then syringe to three way tap
- Aspirate air via three way tap, ensuring tap is closed whenever the syringe is removed so no air is allowed into the chest.
- Aim to aspirate until resistance
- Usually this is less than 2.5L
- Remove cannula
- Apply dressing
Video on pneumothorax aspiration
Post-procedure care
- Analgesia
- Chest X-ray
- If pneumothorax remains greater than 2cm, proceed to a further attempt at aspiration
- If second attempt fails to resolve pneumothorax, seek senior respiratory review with a view to chest drain insertion
- If pneumothorax remains but is less than 2 cm and the patient’s symptoms have improved they can be discharged with future follow up arranged
- The respiratory team are usually happy to see these patients but it is your responsibility to arrange this
- Patients who have suffered a pneumothorax must be advised that they can never do diving (due to pressure changes) and that they cannot fly for at least two weeks after full resolution of the pneumothorax
- The diving rule can only be overturned if the patient undergoes chemical pleurodesis
- Advise patients who smoke to stop
- Smokers have an increased risk of recurrence
In the event of failure of thoracocentesis
- Stop procedure
- Seek senior help
- Repeat chest x-ray and review clinically
Top tips for pneumothorax aspiration (thoracocentesis)
- If discharging a patient with a residual pneumothorax ensure they are aware of this and that they know they should re-attend hospital at any time if their symptoms return or they feel unwell.
- Patients being discharged with a residual pneumothorax MUST have a follow up x-ray arranged to confirm resolution of the pneumothorax at a later date.
- Follow up x-ray can be performed 1-2 weeks later
Click here to download free teaching notes on pneumothorax aspiration: Procedures – Pneumothorax aspiration
Perfect revision for medical students, finals, OSCEs and MRCP PACES


