


Approach to direct ophthalmoscopy
The direct ophthalmoscope

Figure 1. Exemplar of direct ophthalmoscope from the front (left) and behind (right). Credit: Welch Allyn
A. Brow rest
B. Light intensity dial with on/off switch
C. Lens dial for correcting refractive error
D. Lens strength indicator (Green is plus and used for hyperopia; Red is minus i.e. myopia; can be company specific)
E. Opacity setting. Filters to focus on vessels or see past the cornea
F. Left (green circle): a red-free filter that excludes red rays (i.e. the green channel) making it easier to identify veins and arteries
G. Right (circle with ‘x’): the crossed linear polarised filter, which is used to counter intense corneal reflection
H. Aperture dial. For specialised examinations, e.g. following fluorescein dye injection. Use the light projection that is white, round, without cross-hairs. The major choice is whether to use small (for undilated pupil) or large (dilated pupils)
Capabilities:
- 6 degrees of field
- 15-times magnification
To examine
- To examine right eye, use right hand to hold ophthalmoscope and look through it with right eye. If left eye, use left hand and your left eye.
- Approach from 20 degrees temporally while on same horizontal level as patient.
- Other hand can be placed on patient’s forehead to maintain appropriate distance.
Things to consider before starting
- Contact lenses can be left in but ask patient to remove glasses
- Explain procedure, emphasising:
- You will need to come very close
- Light will be bright/uncomfortable, but not painful
- You will place your thumb on their forehead to keep distance
- Patient’s ideal position is sat in chair and fixated at a point behind you.
- Optimise viewing conditions
- Dilate pupils (e.g. 1% tropicamide, an antimuscarinic) if not contraindicated
- Darken room
Examination steps
- Evaluate red reflex i.e. the reddish-orange reflection of retina.
- Comment on whether the reflex is:
- Normal: orange-red glow
- Obscured / pale: Cataract, leukocoria
- Absent: Retinal detachment, strabismus
- Comment on whether the reflex is:
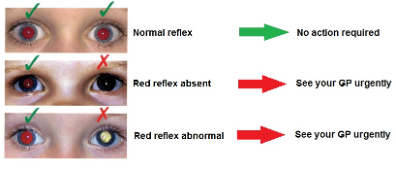
Figure 2. Red reflexes to look out for. Credit: https://www.moorfields.nhs.uk/news/checking-red-reflex
- Visualise the fundus

Figure 3. Structures of the Fundus. Credit: Chu, C. and Salmon, J. 2007; Examination of the fundus; Journal of Clinical Examination; 2:7-14
A. Approximate area of view with direct ophthalmoscope
B. Optic disc
C. Macula
D. Super-nasal arcade
E. Supero-temporal arcade
F. Infero-nasal arcade
G. Infero-temporal arcade
- Optic disc
Can be located by tracking the blood vessel to where its thickest
Comment on:
- Disc edges. Bring them into focus by adjusting lens strength. If unable to do so, suspect papilloedema.
- Colour.
- Normal – red
- Pale – optic atrophy
- Cup-to-disc ratio.
Derived from diameter of the cup (physiological indentation of disc) in relationship to total diameter of the disc.
- 3: Normal; as the cup diameter is typically a third of the disc.
- >0.5: Nerve atrophy and is typically associated with glaucoma.
- Vasculature
Comment on:
- Arteries
- Silver wiring (hypertension)
- Veins
- Tortuous (diabetes)
- Beading (diabetes)
- Nipping (hypertension)
- Presence of irregular, small vessels (neovascularisation)
- Signs at the peripheries
Comment on:
- Haemorrhage
- ‘flame’-– hypertension
- ‘dot-blot’ – diabetes
- Exudates (hypertension, diabetes)
- Hyperpigmentation (RP)
- Hypopigmentation (photocoagulation)
- Macula
Comment on:
- Macular oedema
- Drusen (AMD)